Categories
Sauces and Salsas The Book

135. Green Mayonnaise p.887


The recipe

This mayo is meant to accompany the Poached Salmon in Aspic. I wasn’t quite sure why an aspic covered fish, served with aspic on the side, needed a mayonnaise as well. My guests didn’t eat much of this mayo with the salmon, possibly because I didn’t make it obvious enough that they were meant to be served together, but I suspect it was because no one really felt it was lacking in mayo. If it had just been a poached salmon, a nice sauce would be appreciated, but it seemed out of place with the aspic.

The recipe is dead simple. I started with a cup of yesterday’s recipe for plain mayonnaise. I ran parsley, chives, tarragon, and dill through the food processor with lemon juice and half the mayo. I omitted the optional chervil. Once it was smooth, I added the rest of the mayo, and stuck it in the fridge to come together for a couple of hours.

It tasted very much like mayonnaise with a bunch of herbs puréed into it. Fresh herbs are almost always nice, and they added all sorts of flavour to the mayo. Tarragon and dill aren’t subtle, so it was fairly bold. The additional lemon juice and water from the herbs thinned it out a lot, so it was more of a drizzling than a spreading mayo. As I said, it didn’t do much for the salmon, so I was left with a lot of this. I couldn’t really think of many other uses though. I tried sandwiches, I tried serving it with grilled chicken, and I put some on asparagus. In all cases it was just fine, but I would have preferred plain old mayo, or perhaps an aïoli. Simply grilled or poached fish would be a natural use for this, which I wouldn’t mind trying it at some point, and if it were thicker it could be quite interesting with French fries.

I’m sure there’s a dish out there just begging for a drizzle of green mayonnaise, but I haven’t found it yet.

Categories
Fish and Shellfish The Book

133. Poached Salmon in Aspic p.318


The recipe

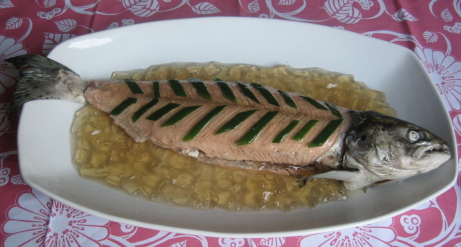
I had so much fun making and presenting this, that even if it been inedible, it would have been worth it. Luckily, it tasted quite good. I absolutely knew that I needed an occasion to serve this dish. In honour of the aspic coated days of yore we organized a retro-potluck extravaganza. People brought cheese balls, bean casseroles, cocktail weenies, deviled eggs, mac and cheese, potato salad, and old fashioned cocktails. Then I brought out a cold fish covered in salmon flavoured Jello. Most people weren’t too sure what to make of it, but it certainly caused a stir.

For people who’ve been following along for a while now, it should be clear that I have an abiding affection for old-school, kind of nasty, but kind of great, dishes. For me this is the ne plus ultra of that style of cooking. It’s got the pressed linen and polished silver grandeur of days gone by, as well as a gross out, dare your friends to eat it, backwardness. I’ve been thinking about trying a salmon in aspic for a couple of years, but after an enlightening conversation with my dining companion’s mother, in which I accused her grandmother of having been a great aspicker, I was determined.

The recipe was quite involved, and time consuming. I started by poaching the salmon in water, with lemon, onion, carrot, celery, bay leaf, parsley stems, thyme, and peppercorns. Then whole poacher went into the fridge for 8 hours to let the flavours infuse. The recipe calls for a 24-inch fish poacher, which I don’t have. The biggest one I could borrow was 19 inches, so I used a smaller Atlantic salmon (4 lbs instead of 6).

Once the fish is chilled, it’s removed to a cookie sheet, and the broth is strained, fortified with white wine, Madeira, thyme, and salt, then reduced. Meanwhile the most painstaking part of recipe begins, the removing of the nasty bits of salmon. Beyond a little trimming of excess bones, and floppy fatty folds, it involves peeling all the skin and dark flesh off the fish. It’s an easy instruction to read, but a delicate and painstaking job.

Once the broth is reduced, it gets a further addition of leek, carrot, celery, egg whites, and crushed up egg shells, and gently simmered. You’re basically making a fish consommé in this step, using the egg whites and shells to trap little particles in the protein net they form, all the nastiness forms a raft at the top, and once you run the broth through a couple of layers of paper towel you end up with a crystal clear broth. This is one of those incredibly simple cooking techniques, that’s undeniably cool. People were going nuts about using gelatin filtration to make unusually flavored consommés a couple of months back, but making the original had its own charms.

The reduced and perfectly clear broth is then added to some bloomed gelatin, and allowed to simmer for a couple of minutes ’till everything is dissolved. The mixture is then chilled in a metal bowl, sitting in a water bath ’till the gelatin just begins to set. Then it’s time to work quickly and get the aspic over the fish. I’ve read more than a few aspic disaster stories, of the gelatin just sliding off its target, or clumping up unattractively. So I was a bit worried about this step, but it worked flawlessly. I spooned on a thin layer, chilled the fish for a while, then topped it with some blanched leeks, and applied another layer of gelatin. All of the remaining aspic went into a baking dish and was allowed to set. I then cut it up and surrounded the fish with little wiggly aspic cubes.

The whole point of covering a salmon in aspic is to keep it moist. Obviously the aspic adds flavour, and texture, but really it’s all about protecting the fish for a banquet presentation. I have to say it did a very good job on that front. The salmon was quite delicious, mild and delicate. For all the aromatics that went into this, nothing overwhelmed. It was more of a subtle background array of flavours. The aspic had a much more concentrated dose of flavour, and I was surprised to like it quite a bit. I wouldn’t sit down to a bowl of aspic, but it had a rich mouth-feel that complimented the salmon, and added little highlights of flavour

It was quite warm the night I served this dish, and we packed about 35 people into our apartment, so it got intolerably hot. Unfortunately the aspic didn’t hold up well under the heat, and mostly melted off my fish within about 15 minutes. Those who got an early serving tried it as it was meant to be, but latecomers only tried poached salmon in Jello soup. I suppose if you were doing this professionally you’d put your serving dish on a bed of crushed ice, but our ice supply was devoted to mixing old-fashioneds, martinis, and Singapore slings.

I was really happy with this dish, from a showmanship perspective this was absolutely worth it. The flavour was very nice, but it couldn’t live up to my expectations for such a dramatic looking dish. It was very mild, and pleasant, which for a crowd pleasing buffet is exactly what you’re looking for. I’m impressed that the recipe is as clearly written and step-by-step easy to follow as it is. I was very afraid going in that this would turn out to be a spectacular failure, but it couldn’t have gone more smoothly. If you’ve ever considered doing something like this, I’d definitely recommend going for it. It was an excellent experience, worthy of a five mushroom rating.
Categories
Soups The Book

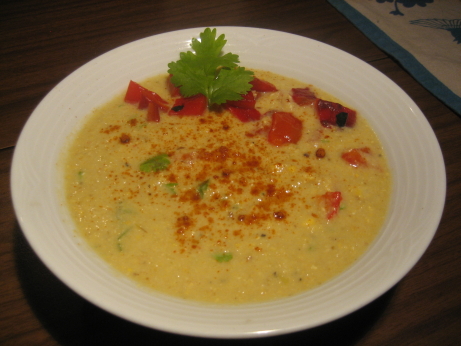
126. Mexican Corn Soup p.87


There’s no online recipe for this one.

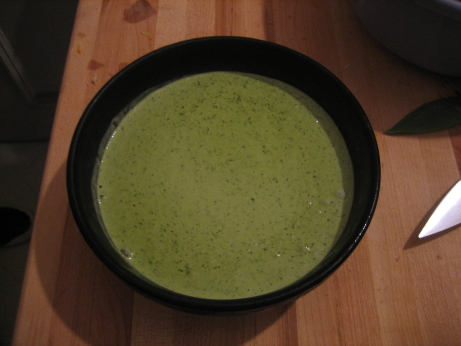
I just don’t know about summertime soups. The Book has dozens of cold soups based on fresh sweet fruit and vegetables. I can’t say that they appeal to me very much. In part it’s the dissonance of cold soup that bugs me, but I’m not even a huge fan of hot soups. When I ask myself what I feel like eating, the answer is almost never soup, especially not in August. For a cold soup, this was fine, but I won’t go out of my way to make it again.

You start by sweating garlic, onion, jalapeños, carrot, and celery with cumin, coriander, salt and pepper. Then stock, water, and both corn kernels and cobs are added and simmered. The cobs are discarded, and the soup is puréed in the blender. Once the soup has cooled to room temperature, some whole cooked corn kernels are stirred in along with roasted red bell peppers, cilantro, and cayenne.

A significant amount of effort went into building flavours for this soup, and they were well balanced and subtle, but they faded to the background almost instantly. I picked up the ingredients for this recipe a few days before I got around to making it, and by then the dew-kissed market-fresh corn I’d chosen wasn’t looking as lively as I would have liked. If I’d had really stellar corn maybe the other flavourings’ camouflage act would have been a positive, and I’d be going on about them not getting in the way of the corn ambrosia. As it was my corn could have used a bit of help.

I had leftovers of this soup for a few days, and it was much better on day three than in the beginning. A footnote to the recipe suggests that you can make it up to a day in advance, but I’d ignore that and give it at least two days to come together. We at this soup as our main course with a chunk of baguette and a simple salad. The soup just wasn’t interesting enough to anchor a meal. It might work as a first course, or better yet as an appetizer soup shooter. Those first couple of bites were good, so why not just stop there?

There wasn’t anything spectacular about the soup, but it wasn’t bad either. I used all the leftovers for lunches, instead of letting it moulder in the back of the fridge. It was solidly average. If I made it again I’d add more jalapeño and less cayenne. More of the jalapeño’s fruity complexity would have been welcome, instead of the straightforward cayenne heat. Stirring in a bit of sriracha chili sauce on day two or three improved matters.

Every summer I feel guilty about not eating enough amazing Quebec corn, especially when you can get a dozen ears for a dollar. Making corn soup seems like a great way to use up that summer bounty when you can’t face another ear of corn on the cob. Unfortunately I forget that I’m replacing the problem of the twelve ears of corn staring at me from the vegetable drawer, with five liters of left-over soup.

Categories
Poultry The Book

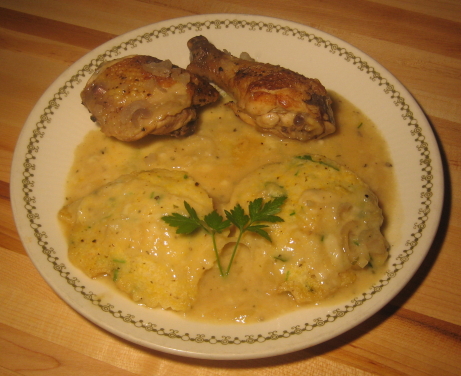
125. Chicken with Cornmeal Dumplings p.373


The recipe

I had The Book for a while before I started The Project, and this was one of the recipes I used regularly before The Book and I got serious. Making it again emphasized how much The Project has changed my cooking style. The biggest difference is that I actually read the recipe this time around, and it came out much better.

You start by breaking a chicken down into serving sized pieces, browning them, and then simmering them with white wine and shallots ’till the pieces are cooked through. Meanwhile you put together a dumpling dough with flour, cornmeal, baking powder, baking soda, salt, pepper, butter, chives, parsley, and buttermilk. The chicken is moved to the oven, and the juices left in the skillet are fortified with stock, cream, salt, and pepper. Once this gravy is simmering the dumplings are gently dropped in and allowed to cook for about 15 minutes, then it’s time to eat.

This time around the cooking went well, there wasn’t anything too tricky about it. In previous attempts I’ve managed to really mess things up. The biggest lesson I learned is that the cooking vessel the recipe calls for really is important. In the recipe all of this happens in a deep 12 inch heavy skillet, I don’t have one of those (but if Santa got my letter…), so I used to make it in a 5 quart pot. It seemed like a pretty decent substitution at the time, but I was wrong. Getting the dumplings right depends on the depth of liquid they’re simmered in, too deep and they disintegrate, or raft together into one super-dumpling. This time I used a 10 quart oval dutch oven, which has a similar surface area to a 12 inch skillet, and things worked out. The other lesson I’ve learned is the difference between a simmer and boil. Previously I had my gravy boiling away, and the bubbles tore my dumplings to shreds, a gentle simmer with just the occasional bubble reaching the surface is the way to go. I’m kind of amazed that I made this recipe about five times trying to get it right, and I didn’t pick up on what I was doing wrong.

My previous attempts also fell prey to my undiagnosed culinary dyslexia.I constantly mix up shallots and scallions, I have the hardest time keeping them straight. They’re very different, but it’s a coin toss as to which vegetable I’ll imaging when I hear one of those words. I’m embarrassed to say that I have the same problem with elevators and escalators, weird eh? Long simmered scallions turn kind of yellow and gross, I wouldn’t recommend the substitution. Some practice with The Book has made me sensitive to my neurological condition, so now I double check that my shopping list corresponds to the ingredient list.

My standards for what constitutes a successful recipe have also changed over the course of The Project. In the pre-Project days this came out reasonably well a couple of times, and I was quite impressed by it. I still love the dumplings, and I’d be happy to make them again and again, but the chicken is lacking, and the whole dish is bland. I’ve ranted about chicken skin and wet cooking methods several times, and it was just as unappealing here as in every other dish. The chicken is poached in white wine and shallots, which is fine, but the addition of another herb would be nice, maybe thyme, rosemary, or tarragon. The chicken gives up flavour and interest for the sake of the dumplings, and it’s almost a fair trade. The dumplings have an excellent texture and flavour, they pull in loads of chicken flavour, and have a wonderful buttermilk tang. They’re absolutely the highlight of the dish. I’d rather skip the whole chicken making part of this dish, and just make the dumplings in a stock based gravy. The chicken would be better served by being simply grilled, then served along with the dumplings. Doing something about the beige on beige colour pallet would be nice too.

Maybe I’m being a bit unfair. This dish is a Southern classic, but I have no clue what it’s supposed to taste like. I don’t have any reference point, so I’m probably trying to turn this dish into something it was never meant to be. Using a chicken like this allows a little bit of meat to be stretched into a hearty meal, so there are perfectly good reasons for recipes like this to have developed. And, Its blandly fatty simplicity is what comfort food is all about, but it’s not really my thing these days.

Pre-Project me liked this dish because the dumplings are awesome, but also because it’s essentially a one pot dish, it’s quite inexpensive, not too hard, and it makes good leftovers. Present day me doesn’t mind working a little harder, spending a little more, or using a few more dishes (much to my dining companion’s chagrin) for a better dish. I agree with my former self about the dumplings though.

Categories
Sauces and Salsas The Book

105. Stilton Sauce p.884


No recipe this time

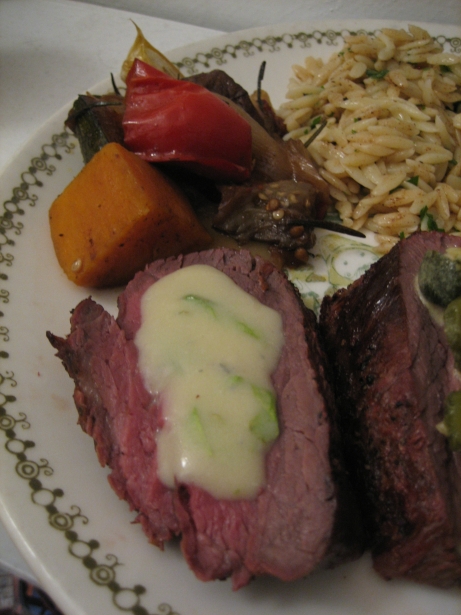
A blue cheese sauce is a classic pairing for a roast tenderloin. This was my favorite of the three sauces I served on this particular evening, but I had trouble remembering anything about it. I incorrectly identified it as a béarnaise sauce in yesterday’s post. I think that says a lot about the sauce.

The recipe calls for Stilton or Roquefort, I prefer Roquefort’s more mellowed character so I went with it. The cheese is softened and mixed with an ungodly amount of butter, and then stirred into a reduced mixture of white wine and heavy cream. Once it’s melted some flat leaf parsley is stirred in, and it’s drizzled over beef or vegetables.

It’s a foregone conclusion that a sauce made of Roquefort, butter, wine, and cream is going to be insanely delicious, and this was. This classic sauce has been replicated so many times in so many ways that it’s lost all novelty though. The only real difference between the blue cheese sauce at a mega chain steakhouse, and a fine dining version is the quality of the cheese going in. But with all the butter and cream the individuality of the cheese is obscured. I don’t find much variation in the world of blue cheese sauces, they’re rich, and delightfully stinky, but they never blow me away. This was no exception, it tasted very good, but there’s nothing to really latch on to about it.

Categories
Pasta, Noodles, and Dumplings The Book

102. Spaghetti with Handfuls of Herbs p.204

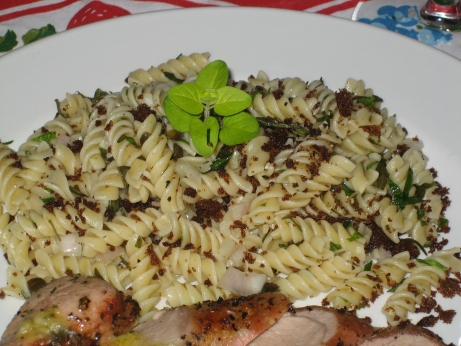
I couldn’t find a recipe for this online, but this is more a concept than a specific set of instructions anyway. The idea is to toss spaghetti with extra virgin olive oil, butter, minced shallots, and any and all herbs growing in the garden. The pasta is then sprinkled with bread crumbs which you’ve toasted in olive oil. The heat of the pasta releases the flavours of the herbs, without wilting them too much, and the uncooked shallots are warmed but retain their sharpness.

There are no specific instructions for which herbs to use, or in what proportions. It’s totally dependent on what you have on hand. I had a grand old time out on the balcony with a pair of scissors. I ended up with basil, thyme, rosemary, oregano, parsley, chives, sage, lavender, and lemon balm. Those last two were unexpected flavours, but they absolutely made the dish for me. I got really lucky and randomly combined my herbs into a near perfect flavour medley. I couldn’t repeat the process, I just snipped a bit of this and a bit of that, and I ended up with a completely delicious and intensely fragrant plate of pasta. My dining companion thought it was good, but not transcendent, but for me it was exactly the right dish at exactly the right time. It was perfectly suited to a warm night out on the balcony.

The bread crumb topping adds a textural counterpoint to the pasta, but not one I thought was really necessary. The Book says that the bread crumbs don’t weigh the dish down the way cheese would, but I just found them oily. Admittedly my bread crumbs weren’t coarse, and they might have worked better if they’d been more like tiny croûtons. Mine were more of a sandy coating on my pasta. It didn’t really detract from my enjoyment of the dish, but I think they ruined it for my dining companion.

You may also notice that I didn’t use spaghetti in this spaghetti dish. I can’t bring myself to care about the different shapes of pasta, and I resent having to remember all of their names. They’re all exactly the same, shells, spirals, round strands, flat strands, big tubes, and small tubes all interchangeable in my mind. Sure, some shapes hold on to some sauces better, and finding things hidden in little shells can be cute. But, the idea that we all need to keep fifteen different shapes of pasta on hand to do justice to the traditions of some particular Italian hamlet is just annoying. They all taste exactly the same, and I’m going to use them as such. The only downside is that the different shapes really do differ in surface area. The amount of sauce needed to coat is proportional to area, which has little to do with mass or volume, so it does take some guesswork to avoid over or under saucing.

The concept of this dish is great, it’s simple and summery. It uses herbs at their peak, and allows for creativity around a central theme. It also has the advantage of not heating the kitchen up too too much. I was thrilled with the flavours at work in my version, and I can only hope you get as lucky as I did if you try this for yourself.

Categories
Grains and Beans The Book

101. Cassoulet de Canard p.273


The recipe

This is The Book’s definitive and official cassoulet recipe. I wrote about the Easy Cassoulet recipe a couple of months ago, which skipped steps and cut corners, but still resulted in a very delicious dinner. This adaptation of Julia’s from Mastering the Art of French Cooking takes two days, and goes out of it’s way to find traditional steps for you to follow.

On the first day you soak the beans. But you don’ just soak them. You bring them to a boil and let them sit for 50 minutes. Then you bring them back to a boil, with a bouquet garni, onions, salt, and pork rind you spent the preceding 50 minutes ritualistically rinsing, boiling, and slicing. Then it’s simmer and skim for the next 1 1/4 hours. The beans are then left to cool overnight.

Day one’s activities continue with the skinning, defatting, and shredding of the duck legs, the browning of mutton (I used veal) bones in a whole cup of goose fat, and the caramelizing of onions in that goose fat. The duck, the bones, the onions, and let us not forget the fat are brought to a simmer with bay leaves, stock, tomatoes, garlic, and white wine. After an hour and half on the stove it’s left to cool overnight.

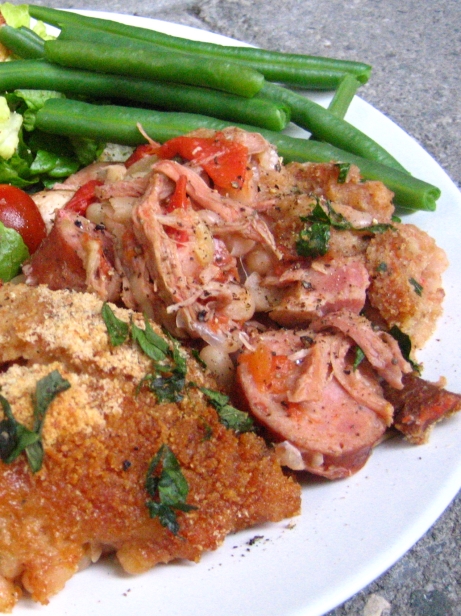
Day two is fairly straightforward. You brown and slice some sausage, and remove the inedible bits from the now cold beans, and the duck mixture. Then the cassoulet is assembled in alternating layers of beans and meat, then topped with bread crumbs and parsley. The recipe calls for a 10 quart enameled cast iron pot, but the biggest one I could get my hands on was 7 3/4 quarts. I managed to get almost everything into the smaller pot, but the full sized pot would have been better. The cassoulet is brought to a simmer on the stovetop, the baked for about an hour until the juices are bubbling up through the crust.

There were a lot of steps, a lot of tricky to source ingredients, and some strange cooking instructions here. It resulted in a rather delicious cassoulet though. I cheated in more than a few places, and messed up in a few others, so I’m not sure the dish came out exactly as it did in The Book’s test kitchens. For the record I had a mix up with the bouquet garni and ended up putting in 15 cloves instead of 5, which really changed the flavour of the beans. I didn’t peel the tomatoes, because I hate peeling tomatoes and I don’t find it’s really worth the effort. I didn’t make beef stock, and I did used the specifically forbidden canned variety. I used a cured garlic kielbasa instead of the fresh garlic sausage called for. I also couldn’t stand the idea of serving the dish with all that goose fat in there, so I removed most of the fat that floated to the top of the meat pot. It was still decidedly rich and fatty, but not nearly as oily as the recipe intended.

That is a long list of cheats, normally I do my best to stick to the recipe as closely as possible, but this time I just wasn’t in the cards. I made the recipe for The Boys on one of our weekend getaways, and I was cooking in an unfamiliar kitchen, with only the equipment I’d thought to bring with me (they don’t cook much, so the facilities are minimal). I couldn’t find some ingredients, some of the steps I just didn’t have time for, and there were a couple of honest mistakes thrown in for good measure. I think the final dish was pretty close to what the original intended though.

In the end the cassoulet tasted great. It was similar to the easy cassoulet, with the duck and sausage flavours predominating. However, the beans in this version were really worth all the effort. They were tender with a bit of bite left to them, and packed with flavour. Unfortunately a lot of that flavour was cloves, but the smoky bacon, and pork belly were there, with the thyme and onions adding a nice backdrop.

The breadcrumb crust was a bit of a letdown. The easy cassoulet had an amazing crust, made by turning the duck skin into cracklings, and toasting the bread crumbs in some of the duck fat and garlic. That topping was just out of this world, whereas the topping on this dish is just there to absorb some liquid. The recipe has you throw away the confit duck skin and its fat, but then add in a whole whack of goose fat. I really didn’t understand the rationale, it seems like an obvious missed opportunity.

This dish was labour intensive, and I don’t think it would have been nearly as much fun without the help of my co-chef Al. Whenever it’s time to make an excessively fatty fat fat dish, I can count on him. I should also thank the other boys for washing the seeminly endless sink-fulls of goose fat coated dishes this produced. Cassoulet is an absolute indulgence, and indulging is much more fun with friends, especially if you’ve had to work for your reward.

I feel that this recipe is one I’ll make again and again, until I get it just right. My first attempt tasted about as good as the Easy Cassoulet, but I’m sure that with practice this recipe has the potential to blow the easy version out of the water. It’s the kind of dish that people perfect and refine over lifetimes, to get just the right texture in the beans, the perfect amount of bacon flavour, the ideal thickened but still runny texture in the juices. Next time I’ll be much better prepared for some of the more obtuse steps, and counterintuitive instructions. I can see some improvements I’d like to make, but overall it was a delicious, and faithful rendition of a very classic dish.

Categories
Beef, Veal, Pork, and Lamb The Book

93. Grilled Butterflied Leg of Lamb with Lemon, Herbs, and Garlic p.502

The recipe

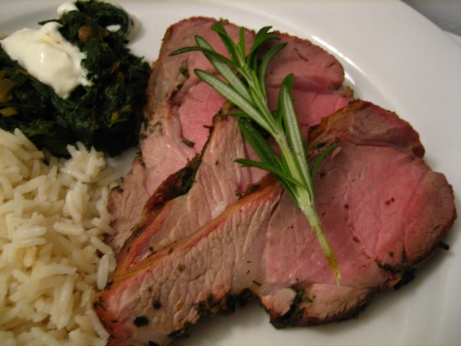
Spring lamb simply prepared is one of the best rewards I can think of for having suffered through a long winter. Spring lamb comes from a younger animal than lamb without an adjective. Generally spring lamb is 3-5 months old, but it can be called lamb right up until a year old. As the animal gets older it’s flavours become more pronounced, so a piece of spring lamb is going to me more delicate and tender than an older lamb. My dining companion is a bit tentative about lamb, but she likes it in small portions. She’s quite sensitive to the goaty flavours it can take on. For her sake I choose spring lamb whenever possible. I appreciate those more intense flavours, especially in a stew. Occasionally I can get my hands on some goat for a nice curry, and if anyone can point me in the direction of some mutton I’ll be forever indebted to you. Even spring lamb packs a serious flavour punch though. In this dish a leg of lamb (spring or otherwise) is taken off the bone, rubbed with lemon, thyme, rosemary, parsley and garlic, then allowed to sit for an hour for the spices to penetrate before being grilled to medium rare.

This preparation shows off everything that makes lamb great. It’s flavourful enough to stand up to a bold spice rub, it’s fatty so it does well with high heat, it cooks quickly, and tastes best just this side of medium-rare. A leg of lamb like this is what grills were invented for. It developed a pungent, crispy exterior, with a melting, delicate interior. The spice rub charred, and smoked the dish, but enough of it got worked into little crevasses that it retained some of its fresh taste. My only regret is that I have a gas grill. If ever there was a time to break out the hardwood charcoal this is it. Some real wood smoke would have done wonders for an already wonderful dish.

I’d like to take a moment to thank my instant read digital probe thermometer. This was the first dish I used it with, and I can’t tell you how happy it made me. Being able to close the grill with the probe in the meat (it’s attached by a long wire to the display), and set an alarm for the desired internal temperature was a revelation. Our grill is on the flimsy side, so every time we open it it loses a huge amount of heat, and it doesn’t have the mass to bounce back quickly. Being able to keep the lid closed means that the top side of the meat is still being roasted and browning without direct exposure to the heat. Since I started using the digital thermometer everything has been coming out better, and I don’t worry about over or under doing anything. It also means I only need to stab one hole, and the probe is much smaller than my old analogue one. If you don’t have one of these things you really owe it to yourself.

This dish was just fantastic. Lamb prepared like this is an absolute classic, and dozens of cultures have their variations on it. This one leans towards the Greek end of the spectrum, and it works exceptionally well. Many many other flavourful spice rubs could work with this preparation though. The beauty is in taking the lamb leg off the bone and butterflying it so that it grills quickly. Increasing the surface area also gets more flavour into the meat, and gives you more deliciously grilled crusty outside bits. I love that this preparation is easy enough for a casual supper, but would work well as the centerpiece for an Easter feast too. Grilled Butterflied Leg of Lamb with Lemon, Herbs, and Garlic has earned its five mushroom rating.

Categories
Grains and Beans The Book

80. Broiled Polenta with Tomato Sauce p.266

The recipe

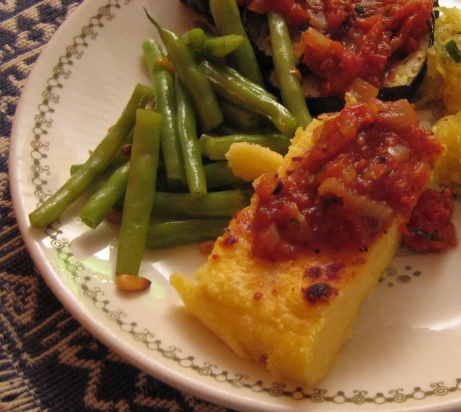
This recipe uses The Book’s Basic Polenta recipe as it’s main ingredient. The basic polenta is a great no-fail staple recipe. Here it’s dressed up by stirring in some cheese, putting it under the broiler, and topping with a very simple tomato sauce.

I served this as part of a vegetarian dinner. It was nicely substantial, and made a good centerpiece for my menu. Very often polenta is served straight from the pot, so that it’s thick but still runny, which highlights the risotto like creamless creaminess. Here the polenta is poured into a baking dish and allowed to cool and set up before it goes under the broiler. This gives it a completely different texture, it ends up gelled and reminiscent of a rice or bread pudding. In this application it seems much more substantial, which is a better base for a sauce. Putting a sauce on a custardy plate of fresh polenta might be a little unidimensional on the texture front.

The recipe calls for fontina to be stirred into the hot polenta. I don’t think I’ve ever used or tasted fontina, and I didn’t use it here. I substituted a mixture of mozzarella and cheddar, and called it good enough. It browned up nicely, and melted seamlessly into the polenta, so it seems like a fair substitution to me.

The tomato sauce was extremely simple, perhaps too simple. The sauce is nothing but softened onions, a bit of garlic, a can of tomatoes, salt, pepper, and a pointless dash of parsley. I’m writing this in August when the local tomato crop is at it’s peak, and it seems like the less you do to them the better everything ends up. I made this sauce in April, using canned tomatoes, when charms of a minimalist sauce aren’t quite as beguiling. I’ve got nothing against canned tomatoes, they’re much more flavorful than the mealy, flavourless, perfectly red, imported California tomatoes we get in April. But, they can’t compare to the hight of summer’s flavour. If you’re going to do a slow cooked sauce based on canned tomatoes I think a bit of flavouring is important. I would definitely have added a bay leaf to the sauce, and thyme or oregano wouldn’t have hurt anything at all, a splash of vodka would bring out those flavourful alcohol soluble compounds in the tomatoes, and a hint of fire from a chile or red pepper flakes wouldn’t have been unwelcome. Once the sauce was finished I tasted it and stirred in some fresh rosemary, which really improved things.

This dish was fine, but a better concept than execution. It started with a really excellent polenta base, but didn’t do enough to it. The addition of cheese and time under the broiler added great flavour and texture, but the lackluster sauce was at best a missed opportunity, and at worst dragged the dish down. There’s a huge amount of room to play and experiment with a dish like this. It’s rare that I accuse The Book of being too simple, or lacking in obscure ingredients, but this is one of those times.

Categories
Beef, Veal, Pork, and Lamb The Book

76. Cilantro Walnut Filling p.420

The Recipe

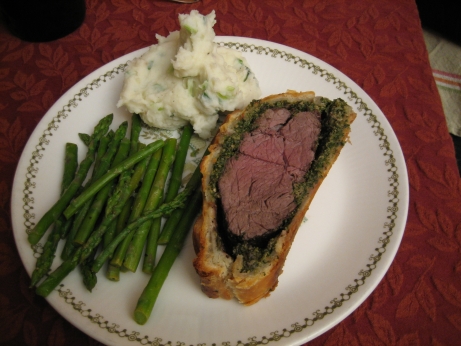
This is the filling for Twenty-First Century Beef Wellington. The filling for Beef Wellington in the 19th and 20th centuries was a duxelles and paté de foie. It’s a very French preparation which was renamed and popularized by the British. This twenty-first century version has a lot more in common with Argentina than the old world. I tasted it and my first thought was chimichurri. It’s a preparation of blanched spinach, cilantro, parsley, chopped walnuts, garlic, honey, bread crumbs, egg whites, cumin, corriander, salt, and pepper. The whole thing goes into the food processor and pulsed until smooth.

As a filling for a dish called Beef Wellington it was fairly weird. As a sauce for roast beef tenderloin is wasn’t bad. I can’t get over the preconception of what goes into Beef Wellington. I understand and appreciate the need to play around with traditional dishes, to update them, to take a fresh look at what makes them good, and to help the dishes to evolve with our tastes. Maybe in the twenty-second century I’ll be ready for this filling, but to my palate Beef Wellington without mushrooms in some capacity just can’t be Beef Wellington.

I think I would have preferred to leave the walnuts and cumin out of this filling. Without them it would have been a nice pesto, and might have worked better in the dish. Replacing the walnuts with pine nuts (another pesto classic) would work well too. The walnuts were toasted, and chopped fine in the food processor. This gave them kind of a mealy texture that didn’t really break down into a paste, and didn’t retain much crunch. I also wasn’t crazy about the flavour of the walnuts with the cilantro. The cumin was a distracting touch, that I didn’t think was particularly necessary.

I think a variation on this filling served over a grilled steak would work quite well. It doesn’t stand a chance as a replacement for duxelles in my heart. I give them credit for trying to cut the calorie count of the Beef Wellington, but this isn’t an adequate substitute. I’ll give it a three mushroom rating as a pesto, but as a filling for Beef Wellington it wouldn’t merit more than a two.